

The difference between professional and amateur audio often comes down to one overlooked factor—mic placement. Even with a high-end microphone, poor positioning can lead to muffled vocals, excessive background noise, or harsh plosives.
Finding the right mic angle is not guesswork; it’s a science. The way a microphone captures sound depends on its type, distance, and tilt. Adjusting these elements can drastically improve clarity, reduce unwanted noise, and enhance overall sound quality.
This guide breaks down the key mic stand adjustments needed for different recording situations. Learn, How to setup mic at Home Studios. Let’s get straight into it!

Key Factors That Influence Mic Angle
A microphone captures more than just the intended sound—it picks up everything around it. To achieve the best audio quality, it’s essential to understand the factors that influence mic positioning. Small adjustments can make a significant difference in clarity, tone, and background noise reduction. Read, Guide for tripod stand.
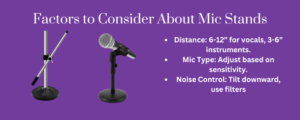
1. Distance from the Sound Source
Placing the microphone too close to the sound source can result in distorted audio, excessive bass, and unwanted plosives. On the other hand, positioning it too far away causes the sound to lose clarity while increasing background noise.
The ideal distance varies depending on the microphone type, but for vocal recordings, a range of 6 to 12 inches works best. For instruments, a 3 to 6-inch distance ensures a balanced capture without losing detail.
2. Microphone Type & Sensitivity
Different microphones require different placement techniques due to variations in sensitivity and pickup patterns.
- Condenser Microphones – These are highly sensitive and capture a wide frequency range. Positioning them slightly off-axis helps prevent harsh sounds and excessive sibilance.
- Dynamic Microphones – Less sensitive than condenser mics, they work best when placed closer to the sound source to produce a fuller, more detailed sound.
- Ribbon Microphones – Known for their warm, natural tone, ribbon mics require stable positioning to maintain consistent audio quality. Sudden changes in angle can alter their sound drastically.
3. Room Acoustics & Background Noise
The angle of a microphone plays a crucial role in minimizing unwanted noise. Tilting it slightly downward can help reduce reflections from walls and ceilings, leading to cleaner audio.
You can also use accessories like a pop filter to control plosives, while a shock mount prevents vibrations from traveling through the mic stand and affecting the recording. A well-thought-out mic placement strategy ensures a professional and polished sound.
Best Mic Angles for Different Uses
Microphone placement varies based on the type of recording. A small adjustment in angle can make the difference between clear, professional sound and poor-quality audio. Here’s how to position your mic for different applications:
1. Vocals (Singing & Podcasting)
Achieving clean and natural vocals depends on proper mic positioning.
- Angle: Tilt the microphone 5 to 15 degrees off-axis to reduce plosive sounds like “P” and “B” without losing clarity.
- Distance: Maintain 6 to 12 inches between the mic and your mouth to balance volume and minimize distortion.
- Direction: Avoid pointing the mic directly at the mouth. Position it slightly above, below, or to the side to capture a natural tone.
Additional Tips:
- Use a pop filter to soften harsh breath sounds.
- Experiment with mic height to capture different vocal textures.
2. Instrument Recording
The right mic angle ensures an instrument’s true tone is captured without unwanted resonance or muddiness.
Acoustic Guitar:
- Position the mic at the 12th fret, angled toward the sound hole to balance brightness and depth.
- Avoid aiming directly at the sound hole, as this can create a boomy, overpowering tone.
Electric Guitar (Amp Recording):
- Place the mic off-center from the speaker cone, angled 30 to 45 degrees for a natural, well-rounded tone.
- Closer placement captures more detail; increasing the angle softens high frequencies.
Drums:
- Overhead Mics: Angle downward toward the drum kit for an even balance of cymbals and drums.
- Snare & Kick Drum Mics: Tilt slightly toward the drumhead to capture attack and depth without excessive resonance.
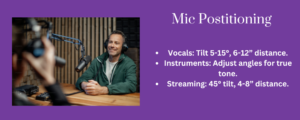
3. Streaming & Voiceovers
For online content creation, clarity and consistency are key.
- Angle: Position the mic at a 45-degree tilt slightly below or to the side of the mouth to prevent popping sounds.
- Distance: Keep 4 to 8 inches from the microphone to maintain a warm and present voice.
- Background Noise Control: Angle the mic slightly downward to reduce room reflections and external noise.
Additional Tips:
- Use a shock mount to minimize vibrations.
- Monitor sound in real-time with headphones to catch any distortions early.
Proper mic positioning enhances clarity, reduces background noise, and ensures professional-quality recordings across different setups.
Common Mic Placement Mistakes & How to Fix Them
At this point, you have a good amount of ideas about how you should fix your mic to maintain a proper angle while enjoying crystal-clear recording. To avoid any mistakes in the setup, this table will guide you to stage everything perfectly for the optimum results:
| Mistake | What Happens? | How to Fix It? |
| Mic Too Close | Distortion, excessive bass, and plosive sounds. | Maintain 6-12 inches distance; use a pop filter. |
| Mic Pointed Straight at the Sound Source | Harsh frequencies and plosive sounds. | Tilt 5-15 degrees off-axis. |
| Ignoring Room Acoustics | Echo, reflections, and background noise. | Move away from hard surfaces, and add acoustic treatment. |
| Wrong Mic Angle for Mic Type | Loss of clarity or unnatural tone. | Adjust based on mic type (condenser, dynamic, ribbon). |
| Not Adjusting for Voice Types | Deep voices sound too bassy, and high-pitched voices sound thin. | Angle upward for deep voices and downward for higher voices. |
| Mic Instability | Vibrations and accidental bumps in the recording. | Use a shock mount and a sturdy mic stand. |
Conclusion
Getting the perfect mic stand angle isn’t complicated, but small adjustments make a big difference. The right placement ensures clear, balanced sound while minimizing distortion and background noise. Maintain the right distance, tilt the mic appropriately, and stabilize your setup for the best results. Before recording, always test different angles and listen back to fine-tune your setup. A few extra minutes of positioning can save hours of post-processing. Great audio starts with proper mic placement—master it, and every recording will sound professional. Also read, Top 5 Mic Stand for professionals.