

Placing your microphone in the right way is necessary as it can make or break your performance. The wrong microphone placement can result in errors and undesirable sound quality. However, if you are a beginner, adjusting the mic properly might be a tough task for you. One thing about boom arm stands is that they are fully adjustable; you can rotate them in any direction and set them to any angle you want. This allows you to securely position your mic in any direction you want, which enhances your performance to a great extent.
Importance of mic placement for instruments
- Tonal accuracy: the position the mic determines the frequency, clearance and resonance of your instrument. If the mic is not placed securely, there might be errors, which may hamper your performance.
- Noise reduction: positioning your mic properly prevents unnecessary noises and chaos, which enhances your performance to a great extent. For noise reduction, you can also use pop filters, which make the sound quality better.
- Dynamic control: positioning your mic at the right angle and height enhances how a mic captures dynamics.
Get various musical accessories at low prices at PROLIGHT SOUNDS.
Top boom arm recommendations
OIMLFUS
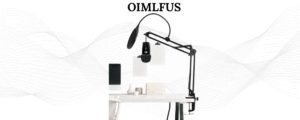
- It is made of alloy steel, which is a very durable material. The product weighs around 2.16 pounds, which is a decent weight for a boom arm stand. Its light weight makes it easy for you to set it up.
- It comes with a gooseneck that can be adjusted up to 360 degrees, which means it can be rotated in all directions and can be set to any angle you want.
- The MIC-DeskStand-02 package also includes 3/8″to 5/8″ screw, and 3/8″ to 1/4″ screw adapters which are compatible with various mics including Blue Yeti, Blue Yeti Nano, Blue Snowball and many other premium microphones.
- It also comes with various recording accessories, including 1 x table clamp, 1 x mic holder/clip, 1 x pop filter, 1 x mic cap and 5 x cable ties.
5 CORE
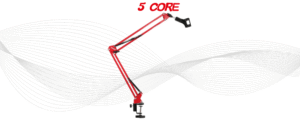
- The boom arm has a load capacity of 1.5 kg, which means it has the capability to hold the heaviest microphones, providing you with immense stability and long-term durability, no matter how long you use it.
- It comes with a 3/8 to 5/8” screw adapter which is convertible and is compatible with a wide range of microphones and other necessary accessories that enhances your performance to a great extent.
- It comes with various microphone recording accessories, including 1x Mic Arm and 1x mic holder, which is used to hold your microphone. You can also adjust the mic and change the angle according to your convenience. 1x Table Clamp, which helps you to clamp the stand to your desk and other necessary equipment, enhancing your performance.
Here are some of the most durable boom arms for daily use: The Most Durable Boom Arms for Daily Use.
SUNMON
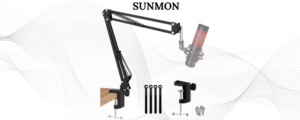
- The desk clamp is as thick as 4.8cm , and it can clip to any desk that has a width of 1.89 inches. It has a sponge attached to the desk base, which prevents your desk from getting damaged with scratches.
- It comes with a 3/8″ to 5/8″ adapter, which is compatible with various microphones, including HyperX QuadCast, Blue Yeti, Blue Snowball, HyperX solo cast, Shure MV7, Shure SM7B and Fifine K688.
- It weighs around 1.19 pounds, which is lightweight, and makes the stand portable. If you have a small studio, this would be an ideal pick for you.
- It comes in different color variations, including red and white. They also sell boom arms with different features and types. Low-profile stands are also available.
Get customized boom arms at affordable prices Customizations in Boom Arm Mic Stands
Top tips for Positioning boom arms with instruments
- Guitar and bass amp miking: Make sure the mic is placed 1-3 inches away from the speaker cone to make sure the recording goes smoothly. You can extend the arm further if you want to record from a distance.
- Piano and acoustic instrument: use both arms for a spaced pair configuration. Make sure that the knobs are tightened properly to enhance your performance. If you are using an acoustic guitar, place the mic towards the 12th fret for clear sound quality.
- Drum kit mic placement: position the arm at a 45-degree angle, placing the mic at the centre. If you are using overhead drums, extend the arm horizontally for recording perfectly.
Here are some ideal boom arm stands for podcasting: Using a Boom Arm Stand for Podcasting: Beginner’s Guide.
Conclusion
Proper placement of your mic enhances your performance by making sure that there are no errors while recording. It’s necessary to identify and place the mic at the right angle and height to make sure that the sound is smoother and flawless.
Get bulk musical products for your business at 5 CORE.